Learning about Exposure – The Exposure Triangle
 Bryan Peterson has written a book titled Understanding Exposure which is a highly recommended read if you’re wanting to venture out of the Auto mode on your digital camera and experiment with it’s manual settings.
In it Bryan illustrates the three main elements that need to be considered when playing around with exposure by calling them ‘the exposure triangle’.
Each of the three aspects of the triangle relate to light and how it enters and interacts with the camera.
Bryan Peterson has written a book titled Understanding Exposure which is a highly recommended read if you’re wanting to venture out of the Auto mode on your digital camera and experiment with it’s manual settings.
In it Bryan illustrates the three main elements that need to be considered when playing around with exposure by calling them ‘the exposure triangle’.
Each of the three aspects of the triangle relate to light and how it enters and interacts with the camera.
The three elements are:
- ISO – the measure of a digital camera sensor’s sensitivity to light
- Aperture – the size of the opening in the lens when a picture is taken
- Shutter Speed – the amount of time that the shutter is open
It is at the intersection of these three elements that an image’s exposure is worked out.
Most importantly – a change in one of the elements will impact the others. This means that you can never really isolate just one of the elements alone but always need to have the others in the back of your mind.
- ISO – the measure of a digital camera sensor’s sensitivity to light
- Aperture – the size of the opening in the lens when a picture is taken
- Shutter Speed – the amount of time that the shutter is open
It is at the intersection of these three elements that an image’s exposure is worked out.
Most importantly – a change in one of the elements will impact the others. This means that you can never really isolate just one of the elements alone but always need to have the others in the back of your mind.
3 Metaphors for understanding the digital photography exposure triangle:
Many people describe the relationship between ISO, Aperture and Shutter Speed using different metaphors to help us get our heads around it. Let me share three. A quick word of warning first though – like most metaphors – these are far from perfect and are just for illustrative purposes:
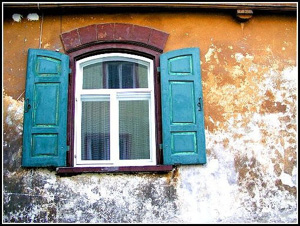 The Window
Imagine your camera is like a window with shutters that open and close.
Aperture is the size of the window. If it’s bigger more light gets through and the room is brighter.
Shutter Speed is the amount of time that the shutters of the window are open. The longer you leave them open the more that comes in.
Now imagine that you’re inside the room and are wearing sunglasses (hopefully this isn’t too much of a stretch). Your eyes become desensitized to the light that comes in (it’s like a low ISO).
There are a number of ways of increasing the amount of light in the room (or at least how much it seems that there is. You could increase the time that the shutters are open (decrease shutter speed), you could increase the size of the window (increase aperture) or you could take off your sunglasses (make the ISO larger).
Ok – it’s not the perfect illustration – but you get the idea.
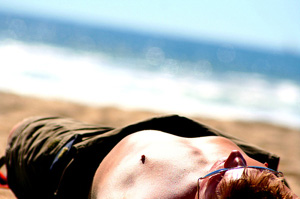 Sunbaking
Another way that a friend recently shared with me is to think about digital camera exposure as being like getting a sun tan.
Now getting a suntan is something I always wanted growing up – but unfortunately being very fair skinned it was something that I never really achieved. All I did was get burnt when I went out into the sun. In a sense your skin type is like an ISO rating. Some people are more sensitive to the sun than others.
Shutter speed in this metaphor is like the length of time you spend out in the sun. The longer you spend in the sun the increased chances of you getting a tan (of course spending too long in the sun can mean being over exposed).
Aperture is like sunscreen which you apply to your skin. Sunscreen blocks the sun at different rates depending upon it’s strength. Apply a high strength sunscreen and you decrease the amount of sunlight that gets through – and as a result even a person with highly sensitive skin can spend more time in the sun (ie decrease the Aperture and you can slow down shutter speed and/or decrease ISO).
As I’ve said – neither metaphor is perfect but both illustrate the interconnectedness of shutter speed, aperture and ISO on your digital camera.
Update: A third metaphor that I’ve heard used is the Garden Hose (the width of the hose is aperture, the length that the hose is left on is shutter speed and the pressure of the water (the speed it gets through) is ISO.
Many people describe the relationship between ISO, Aperture and Shutter Speed using different metaphors to help us get our heads around it. Let me share three. A quick word of warning first though – like most metaphors – these are far from perfect and are just for illustrative purposes:
The Window
Imagine your camera is like a window with shutters that open and close.
Aperture is the size of the window. If it’s bigger more light gets through and the room is brighter.
Shutter Speed is the amount of time that the shutters of the window are open. The longer you leave them open the more that comes in.
Now imagine that you’re inside the room and are wearing sunglasses (hopefully this isn’t too much of a stretch). Your eyes become desensitized to the light that comes in (it’s like a low ISO).
There are a number of ways of increasing the amount of light in the room (or at least how much it seems that there is. You could increase the time that the shutters are open (decrease shutter speed), you could increase the size of the window (increase aperture) or you could take off your sunglasses (make the ISO larger).
Ok – it’s not the perfect illustration – but you get the idea.
Sunbaking
Another way that a friend recently shared with me is to think about digital camera exposure as being like getting a sun tan.
Now getting a suntan is something I always wanted growing up – but unfortunately being very fair skinned it was something that I never really achieved. All I did was get burnt when I went out into the sun. In a sense your skin type is like an ISO rating. Some people are more sensitive to the sun than others.
Shutter speed in this metaphor is like the length of time you spend out in the sun. The longer you spend in the sun the increased chances of you getting a tan (of course spending too long in the sun can mean being over exposed).
Aperture is like sunscreen which you apply to your skin. Sunscreen blocks the sun at different rates depending upon it’s strength. Apply a high strength sunscreen and you decrease the amount of sunlight that gets through – and as a result even a person with highly sensitive skin can spend more time in the sun (ie decrease the Aperture and you can slow down shutter speed and/or decrease ISO).
As I’ve said – neither metaphor is perfect but both illustrate the interconnectedness of shutter speed, aperture and ISO on your digital camera.
Update: A third metaphor that I’ve heard used is the Garden Hose (the width of the hose is aperture, the length that the hose is left on is shutter speed and the pressure of the water (the speed it gets through) is ISO.
Bringing It All Together
Mastering the art of exposure is something that takes a lot of practice. In many ways it’s a juggling act and even the most experienced photographers experiment and tweak their settings as they go. Keep in mind that changing each element not only impacts the exposure of the image but each one also has an impact upon other aspects of it (ie changing aperture changes depth of field, changing ISO changes the graininess of a shot and changing shutter speed impacts how motion is captured).
The great thing about digital cameras is that they are the ideal testing bed for learning about exposure. You can take as many shots as you like at no cost and they not only allow you to shoot in Auto mode and Manual mode – but also generally have semi-automatic modes like aperture priority and shutter priority modes which allow you to make decisions about one or two elements of the triangle and let the camera handle the other elements.
A lot more can be said about each of the three elements in the exposure triangle. WE WILL WORK OUR WAY THROUGH EACH OF THESE OVER THE NEXT COUPLE OF WEEKS.
PART #1 APERTURE
Let’s look at Apertures and Then follow these easy steps to figure out what Aperture can do for you.
Things We’ll Cover in this post:
- What Aperture Is
- Whole Aperture Steps
- Wide and Narrow Apertures
- Step by step guide to learning Aperture
- How to Get Blurry Backgrounds
Aperture equals Depth of Field.The larger your aperture is, the less depth of field your going to have. The smaller your aperture the more depth of field you are going to have.
The full Aperture stops are:
f/1.4 – f/2 – f/4 – f/5.6 – f/8 – f/11 – f/16 – f/22 – f/32 – f/45 – f/64
Now this may seem a little backward at first but the smaller the number the wider or more open the aperture is. The larger the number the smaller or more closed the aperture is. click “what is aperture” for more info.
 Image Taken From: http://nexgadget.com/2011/12/27/engadget-primed-whats-aperture-and-the-way-does-it-affect-my-photos/

Mastering the art of exposure is something that takes a lot of practice. In many ways it’s a juggling act and even the most experienced photographers experiment and tweak their settings as they go. Keep in mind that changing each element not only impacts the exposure of the image but each one also has an impact upon other aspects of it (ie changing aperture changes depth of field, changing ISO changes the graininess of a shot and changing shutter speed impacts how motion is captured).
The great thing about digital cameras is that they are the ideal testing bed for learning about exposure. You can take as many shots as you like at no cost and they not only allow you to shoot in Auto mode and Manual mode – but also generally have semi-automatic modes like aperture priority and shutter priority modes which allow you to make decisions about one or two elements of the triangle and let the camera handle the other elements.
A lot more can be said about each of the three elements in the exposure triangle. WE WILL WORK OUR WAY THROUGH EACH OF THESE OVER THE NEXT COUPLE OF WEEKS.
PART #1 APERTURE
Let’s look at Apertures and Then follow these easy steps to figure out what Aperture can do for you.
Things We’ll Cover in this post:
- What Aperture Is
- Whole Aperture Steps
- Wide and Narrow Apertures
- Step by step guide to learning Aperture
- How to Get Blurry Backgrounds
Aperture equals Depth of Field.The larger your aperture is, the less depth of field your going to have. The smaller your aperture the more depth of field you are going to have.
The full Aperture stops are:
f/1.4 – f/2 – f/4 – f/5.6 – f/8 – f/11 – f/16 – f/22 – f/32 – f/45 – f/64
f/1.4 – f/2 – f/4 – f/5.6 – f/8 – f/11 – f/16 – f/22 – f/32 – f/45 – f/64
Now this may seem a little backward at first but the smaller the number the wider or more open the aperture is. The larger the number the smaller or more closed the aperture is. click “what is aperture” for more info.
Image Taken From: http://nexgadget.com/2011/12/27/engadget-primed-whats-aperture-and-the-way-does-it-affect-my-photos/
Part 1
- Start By Setting Your camera up, if you have a tripod use it, if not set you camera on solid ground and take the same image for each aperture setting.
- Now Grab the longest lens you have. Something longer than 50mm will show the results more clearly.
- Set your camera to A or Aperture Priority Mode.

- Set the aperture to the lowest number your lens can do.
- Snap your first image.
- Use the Full Stop Aperture guide above and take the exact same image at each full stop aperture.
- Upload and post your images to your blog in assignments.
- Write an explanation of what happened as you changed you aperture. Post your writing with your images on your blog on the assignments page.
Shutter Speed
Previously I’ve introduced the concept of the Exposure Triangle as a way of thinking about getting out of Auto Mode and exploring the idea of manually adjusting the exposure of your shots.
The three main areas that you can adjust are ISO, Aperture and Shutter speed. I’ve previously looked at making adjustments to ISO and now want to turn our attention to shutter speed.
- Start By Setting Your camera up, if you have a tripod use it, if not set you camera on solid ground and take the same image for each aperture setting.
- Now Grab the longest lens you have. Something longer than 50mm will show the results more clearly.
- Set your camera to A or Aperture Priority Mode.
- Set the aperture to the lowest number your lens can do.
- Snap your first image.
- Use the Full Stop Aperture guide above and take the exact same image at each full stop aperture.
- Upload and post your images to your blog in assignments.
- Write an explanation of what happened as you changed you aperture. Post your writing with your images on your blog on the assignments page.
Shutter Speed

Previously I’ve introduced the concept of the Exposure Triangle as a way of thinking about getting out of Auto Mode and exploring the idea of manually adjusting the exposure of your shots.
The three main areas that you can adjust are ISO, Aperture and Shutter speed. I’ve previously looked at making adjustments to ISO and now want to turn our attention to shutter speed.
What is Shutter Speed?
As I’ve written elsewhere, defined most basically – shutter speed is ‘the amount of time that the shutter is open’.
In film photography it was the length of time that the film was exposed to the scene you’re photographing and similarly in digital photography shutter speed is the length of time that your image sensor ‘sees’ the scene you’re attempting to capture.
Let me attempt to break down the topic of “Shutter Speed” into some bite sized pieces that should help digital camera owners trying to get their head around shutter speed:
- Shutter speed is measured in seconds – or in most cases fractions of seconds. The bigger the denominator the faster the speed (ie 1/1000 is much faster than 1/30).
- In most cases you’ll probably be using shutter speeds of 1/60th of a second or faster. This is because anything slower than this is very difficult to use without getting camera shake. Camera shake is when your camera is moving while the shutter is open and results in blur in your photos.
- If you’re using a slow shutter speed (anything slower than 1/60) you will need to either use a tripod or some some type of image stabilization (more and more cameras are coming with this built in).
- Shutter speeds available to you on your camera will usually double (approximately) with each setting. As a result you’ll usually have the options for the following shutter speeds – 1/500, 1/250, 1/125, 1/60, 1/30, 1/15, 1/8 etc. This ‘doubling’ is handy to keep in mind as aperture settings also double the amount of light that is let in – as a result increasing shutter speed by one stop and decreasing aperture by one stop should give you similar exposure levels (but we’ll talk more about this in a future post).
- Some cameras also give you the option for very slow shutter speeds that are not fractions of seconds but are measured in seconds (for example 1 second, 10 seconds, 30 seconds etc). These are used in very low light situations, when you’re going after special effects and/or when you’re trying to capture a lot of movement in a shot. Some cameras also give you the option to shoot in ‘B’ (or ‘Bulb’) mode. Bulb mode lets you keep the shutter open for as long as you hold it down.
- When considering what shutter speed to use in an image you should always ask yourself whether anything in your scene is moving and how you’d like to capture that movement. If there is movement in your scene you have the choice of either freezing the movement (so it looks still) or letting the moving object intentionally blur (giving it a sense of movement).
- To freeze movement in an image (like in the surfing shot above) you’ll want to choose a faster shutter speed and to let the movement blur you’ll want to choose a slower shutter speed. The actual speeds you should choose will vary depending upon the speed of the subject in your shot and how much you want it to be blurred.
- Motion is not always bad. I spoke to one digital camera owner last week who told me that he always used fast shutter speeds and couldn’t understand why anyone would want motion in their images. There are times when motion is good. For example when you’re taking a photo of a waterfall and want to show how fast the water is flowing, or when you’re taking a shot of a racing car and want to give it a feeling of speed, or when you’re taking a shot of a star scape and want to show how the stars move over a longer period of time. In all of these instances choosing a longer shutter speed will be the way to go. However in all of these cases you need to use a tripod or you’ll run the risk of ruining the shots by adding camera movement (a different type of blur than motion blur).
- Focal Length and Shutter Speed - another thing to consider when choosing shutter speed is the focal length of the lens you’re using. Longer focal lengths will accentuate the amount of camera shake you have and so you’ll need to choose a faster shutter speed (unless you have image stabilization in your lens or camera). The ‘rule’ of thumb to use with focal length in non image stabilized situations) is to choose a shutter speed with a denominator that is larger than the focal length of the lens. For example if you have a lens that is 50mm 1/60th is probably ok but if you have a 200mm lens you’ll probably want to shoot at around 1/250.
As I’ve written elsewhere, defined most basically – shutter speed is ‘the amount of time that the shutter is open’.
In film photography it was the length of time that the film was exposed to the scene you’re photographing and similarly in digital photography shutter speed is the length of time that your image sensor ‘sees’ the scene you’re attempting to capture.
Let me attempt to break down the topic of “Shutter Speed” into some bite sized pieces that should help digital camera owners trying to get their head around shutter speed:
- Shutter speed is measured in seconds – or in most cases fractions of seconds. The bigger the denominator the faster the speed (ie 1/1000 is much faster than 1/30).
- In most cases you’ll probably be using shutter speeds of 1/60th of a second or faster. This is because anything slower than this is very difficult to use without getting camera shake. Camera shake is when your camera is moving while the shutter is open and results in blur in your photos.
- If you’re using a slow shutter speed (anything slower than 1/60) you will need to either use a tripod or some some type of image stabilization (more and more cameras are coming with this built in).
- Shutter speeds available to you on your camera will usually double (approximately) with each setting. As a result you’ll usually have the options for the following shutter speeds – 1/500, 1/250, 1/125, 1/60, 1/30, 1/15, 1/8 etc. This ‘doubling’ is handy to keep in mind as aperture settings also double the amount of light that is let in – as a result increasing shutter speed by one stop and decreasing aperture by one stop should give you similar exposure levels (but we’ll talk more about this in a future post).
- Some cameras also give you the option for very slow shutter speeds that are not fractions of seconds but are measured in seconds (for example 1 second, 10 seconds, 30 seconds etc). These are used in very low light situations, when you’re going after special effects and/or when you’re trying to capture a lot of movement in a shot. Some cameras also give you the option to shoot in ‘B’ (or ‘Bulb’) mode. Bulb mode lets you keep the shutter open for as long as you hold it down.
- When considering what shutter speed to use in an image you should always ask yourself whether anything in your scene is moving and how you’d like to capture that movement. If there is movement in your scene you have the choice of either freezing the movement (so it looks still) or letting the moving object intentionally blur (giving it a sense of movement).
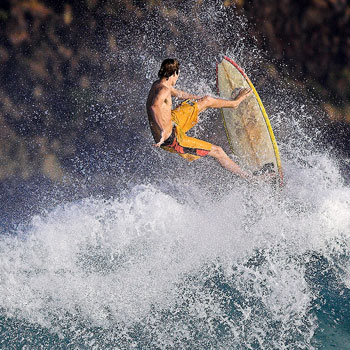
- To freeze movement in an image (like in the surfing shot above) you’ll want to choose a faster shutter speed and to let the movement blur you’ll want to choose a slower shutter speed. The actual speeds you should choose will vary depending upon the speed of the subject in your shot and how much you want it to be blurred.
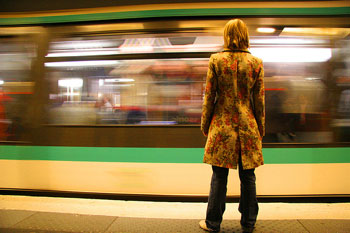
- Motion is not always bad. I spoke to one digital camera owner last week who told me that he always used fast shutter speeds and couldn’t understand why anyone would want motion in their images. There are times when motion is good. For example when you’re taking a photo of a waterfall and want to show how fast the water is flowing, or when you’re taking a shot of a racing car and want to give it a feeling of speed, or when you’re taking a shot of a star scape and want to show how the stars move over a longer period of time. In all of these instances choosing a longer shutter speed will be the way to go. However in all of these cases you need to use a tripod or you’ll run the risk of ruining the shots by adding camera movement (a different type of blur than motion blur).
- Focal Length and Shutter Speed - another thing to consider when choosing shutter speed is the focal length of the lens you’re using. Longer focal lengths will accentuate the amount of camera shake you have and so you’ll need to choose a faster shutter speed (unless you have image stabilization in your lens or camera). The ‘rule’ of thumb to use with focal length in non image stabilized situations) is to choose a shutter speed with a denominator that is larger than the focal length of the lens. For example if you have a lens that is 50mm 1/60th is probably ok but if you have a 200mm lens you’ll probably want to shoot at around 1/250.
Shutter Speed – Bringing it Together
Remember that thinking about Shutter Speed in isolation from the other two elements of the Exposure Triangle (aperture and ISO) is not really a good idea. As you change shutter speed you’ll need to change one or both of the other elements to compensate for it.
For example if you speed up your shutter speed one stop (for example from 1/125th to 1/250th) you’re effectively letting half as much light into your camera. To compensate for this you’ll probably need to increase your aperture one stop (for example from f16 to f11). The other alternative would be to choose a faster ISO rating (you might want to move from ISO 100 to ISO 400 for example).
Remember that thinking about Shutter Speed in isolation from the other two elements of the Exposure Triangle (aperture and ISO) is not really a good idea. As you change shutter speed you’ll need to change one or both of the other elements to compensate for it.
For example if you speed up your shutter speed one stop (for example from 1/125th to 1/250th) you’re effectively letting half as much light into your camera. To compensate for this you’ll probably need to increase your aperture one stop (for example from f16 to f11). The other alternative would be to choose a faster ISO rating (you might want to move from ISO 100 to ISO 400 for example).

Play With Shutter Speed (assignment)
I love technical play with my camera. I love knowing how the buttons and dials work to help create an image.Understanding shutter speed is your ticket to sharp photos.
- Find a moving subject. Water coming out of an outside hose works well for this exercise. A child willing to jump over and over can work as well.
- Place your camera on Shutter Priority (S) on your mode dial.
- Shoot at the fastest shutter speed you can.
- Shoot at the slowest. (Grab your tripod or place your camera on a steady surface for the best results.)
- Work your way through the shutter speeds in between. If you move at three clicks of your dial, you'll move through full stops of shutter speed.
- View your photos and see what results you like.
- Post your findings. (in assignments)
When shooting your everyday life, try to think through your shutter speeds more intentionally. Focus on which is best for your situation.
I love technical play with my camera. I love knowing how the buttons and dials work to help create an image.Understanding shutter speed is your ticket to sharp photos.
- Find a moving subject. Water coming out of an outside hose works well for this exercise. A child willing to jump over and over can work as well.
- Place your camera on Shutter Priority (S) on your mode dial.
- Shoot at the fastest shutter speed you can.
- Shoot at the slowest. (Grab your tripod or place your camera on a steady surface for the best results.)
- Work your way through the shutter speeds in between. If you move at three clicks of your dial, you'll move through full stops of shutter speed.
- View your photos and see what results you like.
- Post your findings. (in assignments)
When shooting your everyday life, try to think through your shutter speeds more intentionally. Focus on which is best for your situation.

No comments:
Post a Comment